Most marketers already understand how they can identify particular referral sources in Google Analytics, but tagging URLs using UTM codes takes this data to an advanced level by isolating visitors referred from specific campaigns (specific email campaigns, for example) to better understand their behaviour and build more specific audience lists to boost the performance of any ongoing paid media activity.
What are UTM Codes?
“UTM” stands for “Urchin tracking module.” UTM codes are added to the end of regular URL’s and are designed to tell Google Analytics (and other analytics tools) a little bit more information about each link and which marketing campaign it relates to.
A type of URL tagging, using UTM codes ensure your destination URLs are labelled with specific campaign names when they’re reported in Google Analytics. Put simply, this enables you to break down traffic that’s usually only reported by its source and attribute it to individual emails or paid search campaigns that you’re running.
The section of the URL following the ? symbol below is a sample of what a UTM code looks like:
https://www.hallaminternet.com/?utm_source=blog&utm_medium=utm-tagging-post&utm_campaign=url-tagging-blog-link-feb-2020
Why use UTM Codes?
Tagging URLs helps prove the value of online campaigns in which you’re attempting to drive traffic to your site, particularly if you have goals set up in Google Analytics, as it will report on each specific campaign’s conversion metrics.
For example, you can use UTM variables within links you post on social media to track how much traffic you receive from each post you publish. You could also use UTM variables to track specific links such as the link to your website from your your Twitter bio. URL tagging can also allow you to gain a greater understanding of the overall performance of each PPC campaign you’re running.
How to Structure UTM Codes
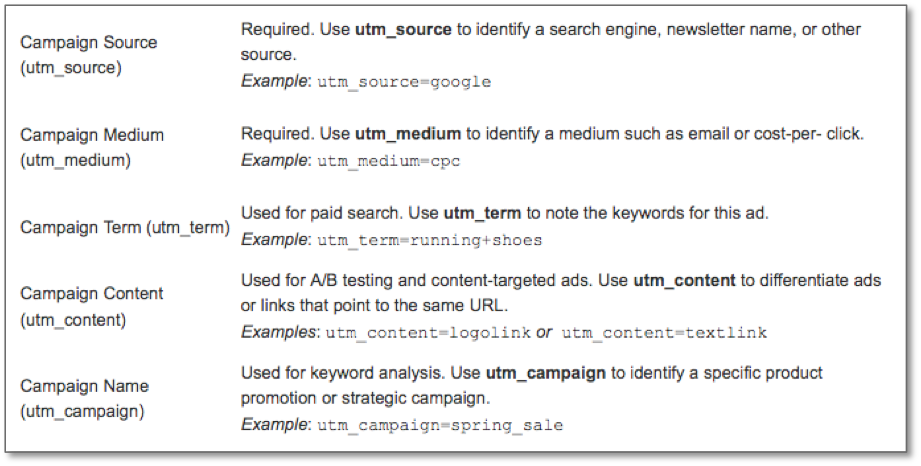
In order to correctly structure your UTM codes you firstly need to understand what each parameter means:
- Campaign Source is usually the search engine or platform that you’re running the ads on (Google, Bing, Facebook, Twitter, Website, etc.)
- Campaign Medium is used to state the type of advertising campaign that’s using the URL (PPC, email, etc.)
- Campaign Name is the field used to insert the name of your campaign.
These three fields are all required, and you can use the remaining content and term parameters to track additional details as explained by Google:
Methods of Setting up URL Tagging
1. Manual URL Tagging
A lot of third party advertising tools have the option to automatically tag URLs, but for tagging specific links within organic social posts, banner links, and any other links used in campaigns conducted outside of third party software, manual URL tagging is the only option.
Now this doesn’t mean you have to craft every UTM tag by hand, as you can do this using UTM generators. There are a range of UTM generators available, but I have listed the most useful below:
- Google’s URL Builder
- Our free UTM Tagging template for Google sheets
- The Excel URL builder
- Effin Amazing’s Chrome extension
Google’s URL Builder is a great free tool to generate URLs tagged with UTM codes for single campaigns, but is not suitable for creating UTM tags in bulk, nor is it great for keeping track of naming conventions.
Try our Free UTM Tagging Template
We’ve recognised that Google’s URL builder doesn’t provide the option to create and track UTM codes in bulk, so we’ve put together a UTM tagger template spreadsheet that will help you easily generate lots of UTM tagged URLs for any marketing campaign.

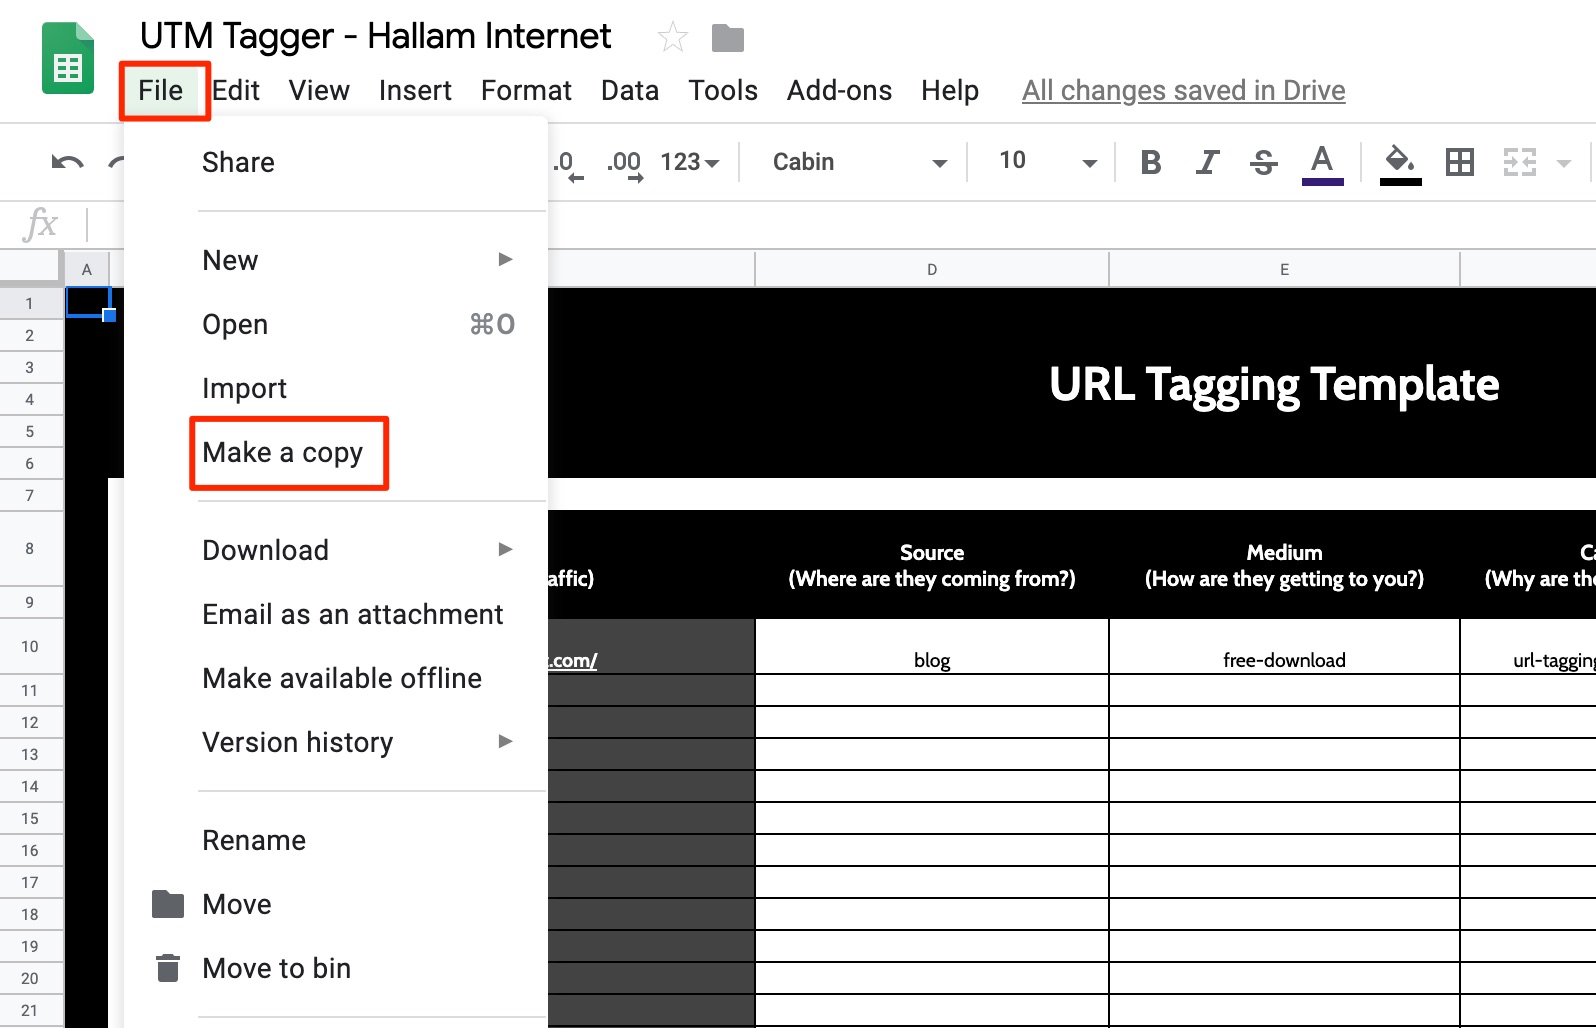
To start using the template, you will need to sign into a Google account. Once logged in, click here to view the free UTM tagging template, then click ‘File’ > ‘Make a copy’ to create your own version and start using it to tag your URLs.
Auto-tagging
Many third party tools have the option to automatically tag URLs using UTM variables. For example, Mailchimp, Buffer and Hootsuite all offer this functionality to paid subscribers.
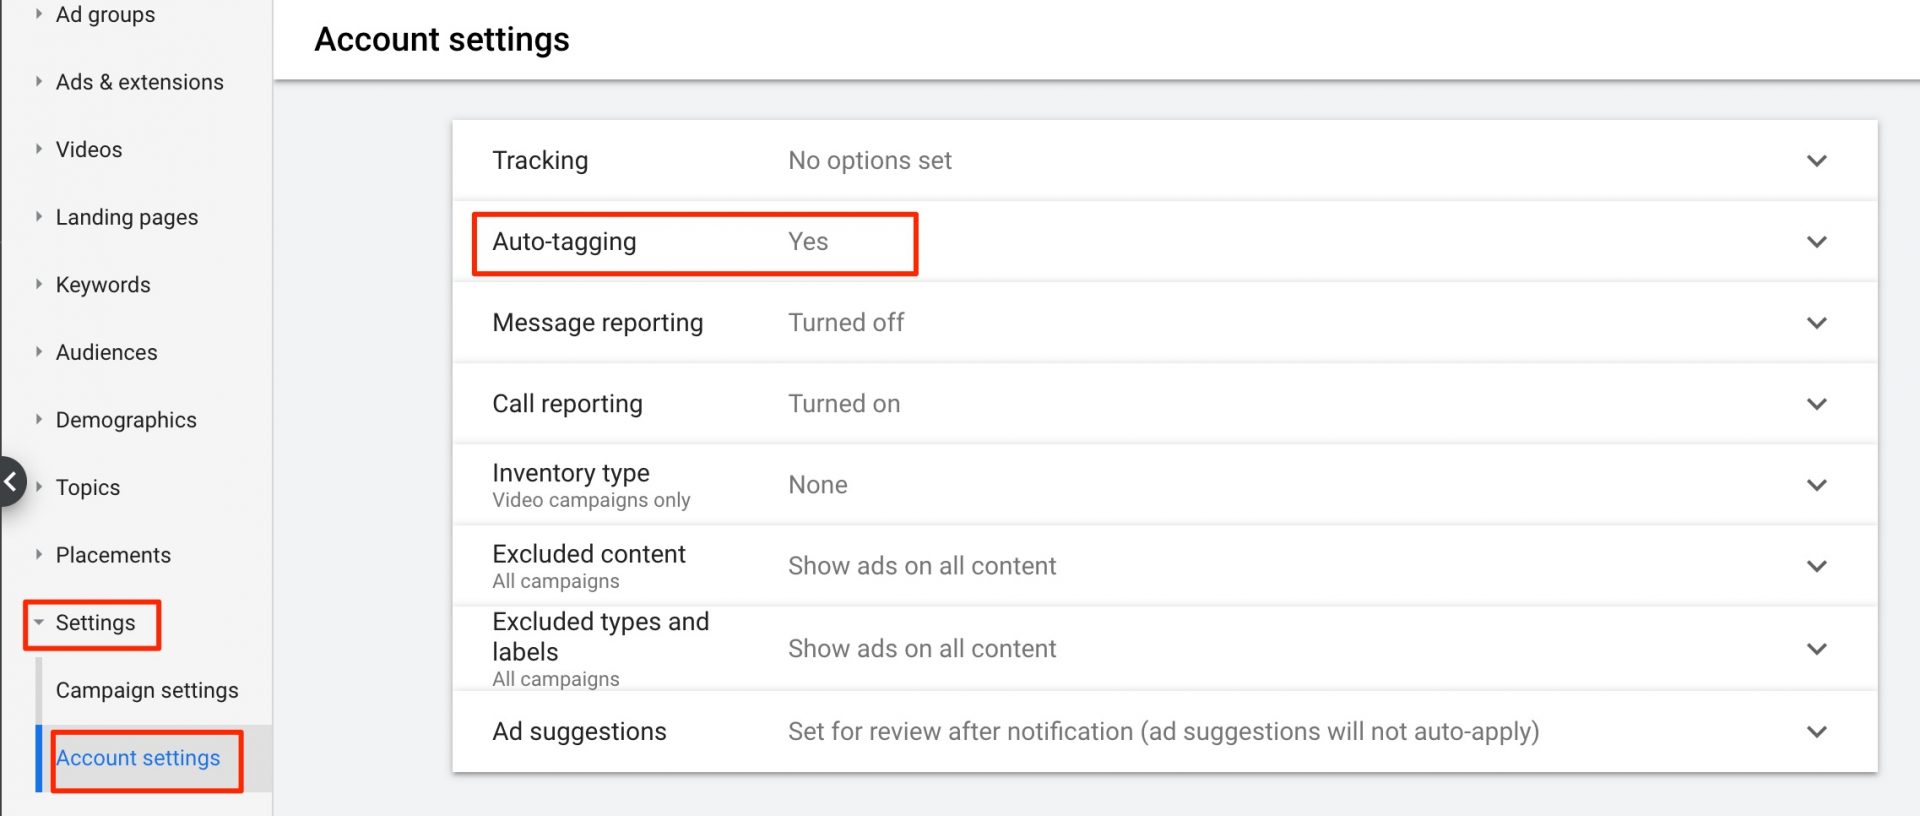
Google Ads users should already be aware that Google offers an auto-tagging feature within the platform which utilises UTM variables.
This feature is selected by default in all Google Ads accounts, but if you’re unsure whether this has already been set up and would like to enable or disable auto-tagging you’ll need to navigate to Settings > Account settings in the left hand menu within a Google Ads account:
Use Consistent Naming Conventions
If using manual tagging, ensure you choose a naming convention that’s easy to remember. For example, with the utm_medium= section of each URL,“Email” or “Display_Ads” are names that you may choose to repeat each time you launch a new campaign in each category. Tagging URLs this way means that you can break down campaign reports in Google Analytics and easily filter by campaign medium.
For the utm_campaign attribute, be sure to use descriptive tags to ensure you’re easily able to decipher what each campaign relates to when looking at the data in GA. For example, the descriptions on the left hand screen grab below are much easier to decipher than those on the right:
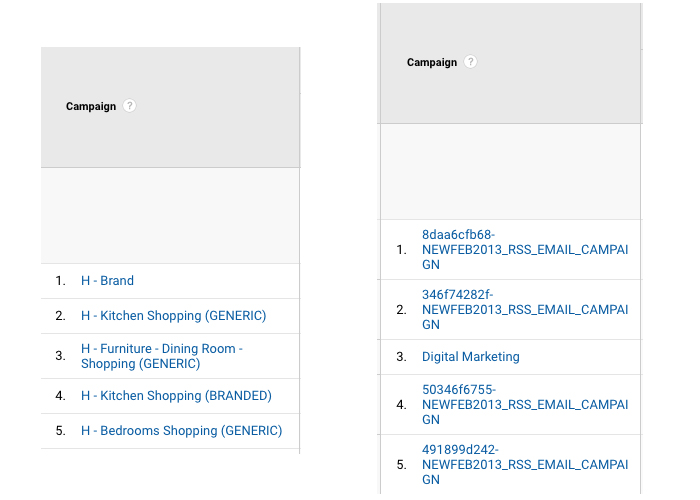
This shows how important is is to use simple, descriptive text in the utm_campaign field where possible.
Improving the Appearance of Tagged URLs to Website Users
It’s true that UTM codes create overly-long, unattractive URLs for users, but there is a solution to resolve this issue.
Let’s assume that we have just tagged the following URL:
http://www.example.com/bens-tagging?utm_source=mysite.com&utm_medium=referral&utm_campaign=url+tracking+post
The URL above looks extremely long and wouldn’t look too friendly to a user who clicks through to it. However, your users never need to see it, thanks to the following snippet of code. You would simply need to place the above link in some anchor text, such as click here. Then on the corresponding landing page you would add the following piece of code to the HTML of the page:
_gaq.push(function() {
window.history.pushState(”,”, ‘some-page‘);
});
This means after the Google Analytics code collected all the attribution data from the really long URL tagging parameters I set in the example, the URL will revert to whatever is placed in the ‘some page’ quotes in the example above.
Where to Find Tagged URL Data in Google Analytics
Once you’ve become comfortable with the idea of tagging campaign URLs and have started to tag URLs across your online marketing campaigns, you’ll need to know where to navigate in Analytics in order to view the information the tags have been delivering.
The information you need can be found in Acquisition > Campaigns > All Campaigns within Google Analytics:
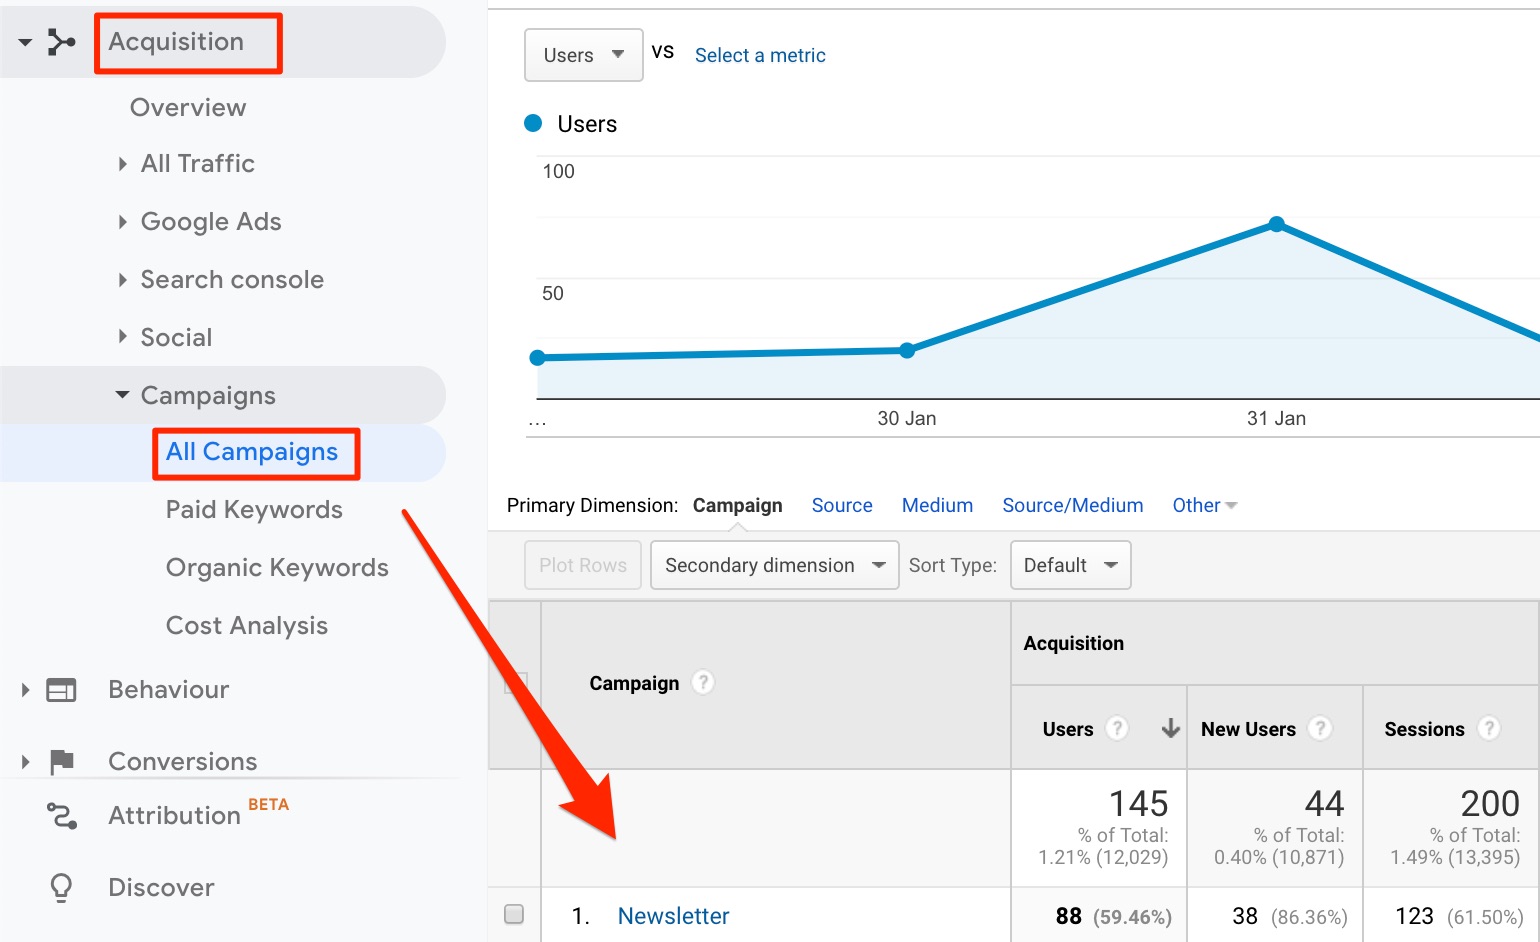
The report will break everything down automatically by Campaign Name.
Remember, if any of your campaigns haven’t yet received any clicks, the parameters you’ve set won’t have been triggered and therefore those URLs will NOT be reported in this section until they’ve actually been clicked.
Did you find this post useful?
Have you just learned something new?
Then join the 80,000 people who read our expert articles every month.

