If you know how to use a spreadsheet, then you have the power to create custom labels within a supplemental feed, without using expensive developers, installing complex modules or waiting on updates to your eCommerce platform.

Why use custom labels in a Google Shopping feed?
Custom labels include five customisable fields where you can add additional information on each item within a shopping feed on Google or Bing Merchant Centre.
By labelling products differently, you can segment products up into more meaningful product groups, which in turn allows for more precise bidding. More precise bidding means less ad cost wastage on poorly performing products and higher volumes generated from highly performing products to increase overall profitability.
Which custom labels should I choose?
If you run limited promotional sales on your website then it’s ideal to separate products which are on sale so you can treat them differently. Some e-commerce businesses use sales to clear out old stock, therefore you could place higher bids on sale items to show them more often. Otherwise, items on sale will most likely have a higher conversion rate, but they will also have lower profitability so by analysing the data you can make the call to raise or lower bids on sale items depending on the circumstances.
Other custom labels need to segment data into two or more product groups which have different conversion rates, or which have different levels of profitability, i.e. product group splits which require different bids to be more effective. Ideas to test with your data include:
-
- Price banding – Ensure that expensive products and cheap products don’t belong in the same product group as they have very different profit margins and conversion rates. For example, labels can be “Under £10”, “£10 to £30”, “£30 to £90”, “£90 to £150”, etc.
- Margin banding – Get straight to the chase by grouping products by direct profit margin percentage bandings, allowing you to optimise for profitability
- Seasonality – Many products have a pattern of seasonality when looking at volumes and conversion rates. Sunglasses will sell better in the summer and scarfs will sell better in the winter for example, in terms of volume and conversion rate. Other products may have a very noticeable spike in sales, such as fancy dress before Halloween which can be separated
- Bestsellers – Why lump your best-selling products into the same product groups as poorly performing products?
- White label goods – Selling goods from another supplier usually means a cut in profitability, plus you may wish to promote or demote their products quickly
What’s a supplemental shopping feed?
Supplemental shopping feeds are a simple add-on to the main shopping feed.
They are most commonly used to add additional information to products, such as:
- Updated titles and product descriptions
- Missing data in fields such as size, colour, barcode, etc.
- Special shipping or promotional attributes
- Unique local inventory data
- Removing certain products by marking them as “out-of-stock”
As you may have guessed, we can also add in our own custom labels using a supplemental shopping feed.
We just need to match up the product ID to the new values we add in one of five available custom label fields.
How do you make a supplemental shopping feed?
If you’re new to shopping feeds then make sure to check out our full guide on Using Google Merchant Center Primary Feeds.
As mentioned in this guide, you first need to choose an input method:
- Google Sheets – Google’s free spreadsheet tool
- Scheduled fetch – Google can periodically fetch a TXT or CSV feed directly from a URL
- Upload – Upload a feed via SFTP, FTP, Google Drive, or manually on your own schedule
Creating the supplemental feed
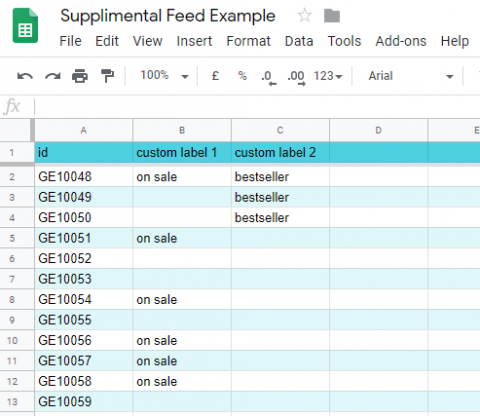
For simplicity let’s create a new Google Sheet for a supplemental feed with these steps:
- Create a new Google Sheet (type “sheet.new” into Google Chrome if you’re using it)
- Give the spreadsheet a unique name so you can easily find it again
- In the cell A1, add the column title “id”
- Place all item ID’s from your original product data feed in column A
- Find an unused custom label number (0 – 4) from your original feed
- Create a new column with the new custom label name in B1
- Add all applicable custom label values
- Repeat if necessary for other new custom labels
Adding the supplemental feed
Next, we need to add the feed into Google Merchant Center:
- Go to – Products > Feeds > Add Supplemental Feed
- Name the feed import and select an existing Google Spreadsheet
- Wait a few hours for the custom labels to take effect once confirmed
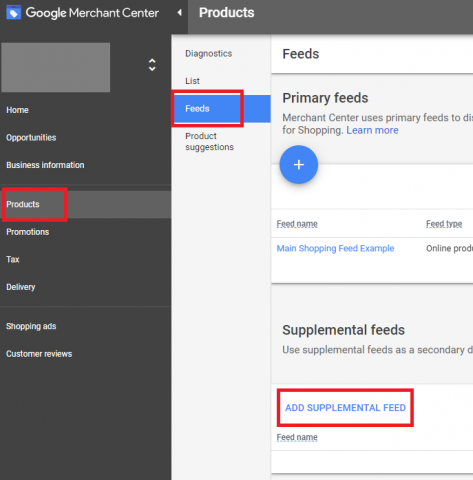
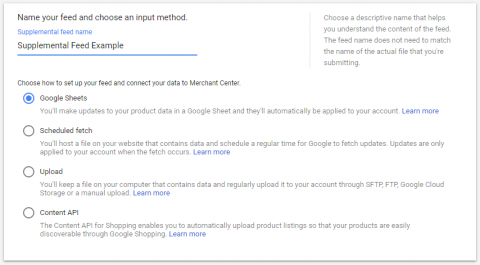
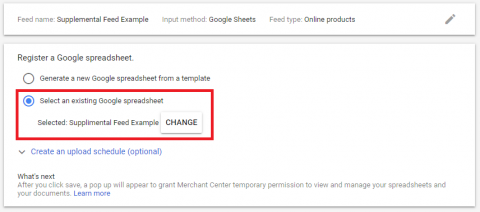
If you use Google App Scripts or Google Ad Scripts then this process could be automated daily, so ensure a daily fetch schedule is set up so the supplemental feed reflects the latest information. A lot of time can be saved with automation.
Other benefits of using custom labels
Other than giving you more control over product groupings and bidding, custom labels can also be used as a valuable signal used to feed into smart bidding algorithms.
Similar to having multiple audience lists active on a campaign, the machine learning algorithm has more signals to work with using divisive custom labels and any other further information about the products listed. Again, this leads to smarter division and bidding, which is all done behind the scenes, which leads to increased performance overall.
